License Types & Control
License Types & Control
Subscription renewals & past_due
For monthly and annual Store purchases, a paid Stripe subscription invoice extends the existing license to the end of its paid billing period. The customer keeps the same key. expiresAt is the paid-through date, not the grace deadline.
A failed renewal sets paymentStatus to past_due. Validation and activation continue through the configured payment grace window: 14 days by default, measured from the paid-through date. Vendors can set 0–365 days in Store → Settings; a license's explicit PostExpiryGraceDays takes precedence, including zero. unpaid keeps the same deadline. Once it is reached, access expires. A successful payment restores active and advances the paid-through date.
During payment grace, the response includes isInGracePeriod: true and paymentStatus: "past_due" or "unpaid". Show a card-update notice while isValid remains true. Non-subscription licenses return no payment state. Offline cache tokens and newly generated offline activation tokens for Store subscriptions are capped at paid-through plus grace. Reconnect to receive a refreshed signed cache token after payment; already-issued offline tokens retain their signed deadline and cannot learn about a cancellation while disconnected.
Scheduling cancellation at period end preserves access through that paid period. When Stripe ends the subscription, customer.subscription.deleted revokes the license. Duplicate invoices and webhook deliveries have no additional effect; older payments never shorten the paid period or reactivate a revoked key.
Register invoice.paid, invoice.payment_failed, and customer.subscription.updated alongside checkout.session.completed, payment_intent.payment_failed, checkout.session.expired, customer.subscription.deleted, and charge.refunded on the vendor's Store webhook endpoint. This is the customer's Store subscription; the vendor's own PermitCore billing is managed separately.
Every licensing model in one platform. Perpetual, subscription, trial, metered, floating, node-locked, bundled — all controlled by the same license key format. Mix and match per product without changing your integration.
Set
ExpiresAt to null for lifetime licenses or a future date for subscriptions. Renewal extends the date — the key stays the same.Issue trial keys instantly, no card required. Automatically expire on a set date. Convert to paid by extending the expiry — same key, no re-integration.
Seat-based licensing with real-time checkout/checkin. Enforce maximum concurrent users across any number of machines.
Bind a license to a specific machine fingerprint. The activation API tracks distinct device IDs up to the key's seat limit; the same ID reuses its seat.
One key that unlocks multiple products simultaneously. Great for suites — one purchase, one key, access to everything in the bundle.
Store a JSON feature map on each license. Your app reads which modules are enabled at validation time — no new keys required for upsells.
Lock a license to a maximum software version. The API checks configured version bounds when your request supplies a version. Maintenance dates are separate metadata.
ECDSA P-256 signed challenge/response for air-gapped machines. No internet required after initial activation file generation.
Sandbox keys behave identically to production keys but are excluded from billing counters and analytics. Safe for CI/CD pipelines.
Save and reuse license configurations — expiry, max activations, feature flags, and metadata. One click to apply a template when creating a new license.
Offline grace period (validate without network for N days) and post-expiry grace period (continue working N days after expiry). Configurable per license.
Track maintenance contract end dates separately from license expiry. Returned to your app for its own update/support policy; the date does not itself reject validation.
Advanced License Management
Advanced filtering
Click the Filters button on the Licenses page to open the advanced filter panel. You can filter your license list by multiple criteria simultaneously:
| Filter | What it does |
|---|---|
| Status | Show only Active, Revoked, or Expired licenses |
| Expires from / to | Find licenses expiring within a date range (e.g. "next 7 days") |
| Tag contains | Filter by tag substring — type "beta" to find all beta licenses |
| Min activations % | Slider (0–100%) — e.g. set to 80% to find nearly-saturated keys |
Active filters show an "ON" badge on the Filters button. Click "Clear" to reset all filters at once.
Bulk update
Select multiple licenses using the checkboxes, then click "Edit Selected". The bulk edit modal lets you update up to 500 licenses in a single operation:
| Field | Behaviour |
|---|---|
| Max Activations | Set a specific number (must be ≥ current activations on each key) |
| Expiry Date | Set a new expiry, or tick "Clear expiry" to make keys perpetual |
| Add Tags | Tags are merged with existing tags — existing tags are not removed |
| Add Notes | Text is appended to existing notes (one new line per update) |
SDK integration snippets
Click the Integrate button in the top-right of the Licenses page to open the SDK snippet generator. It shows copy-ready integration code in curl, Python, Node.js, C#, and PHP — pre-filled with your actual API base URL. Use these to quickly wire up license validation in your application.
Expiry notifications
PermitCore automatically emails Company Admins when licenses are about to expire. Emails are sent at three checkpoints:
- 30 days before expiry — early warning, plan renewals
- 7 days before expiry — action required soon
- 1 day before expiry — urgent reminder
Each license gets at most one email per checkpoint (no daily spam). The email lists every affected key with product name, expiry date, days remaining, and current activation count.
Trial Licenses
Trial licenses let potential customers try your software for a fixed number of days — no manual follow-up required. The license key is valid from creation and automatically expires after the configured trial period.
Creating a trial license
- Go to Licenses → New License
- Toggle "Trial License" on
- Enter the trial period in days (1–365; default 30)
- Generate the key and send it to the prospect — expiry is set automatically
Behaviour
| Setting | Trial license | Regular license |
|---|---|---|
| Expiry | Auto-set to now + TrialDays | Optional, set manually |
| Validation | Standard — returns isValid: false once expired | Standard |
| Conversion | Revoke + issue new regular key, or extend expiry in Edit Metadata | — |
| Badge | IsTrial: true returned in API and portal | IsTrial: false |
Converting a trial to full license
When a trial customer purchases, you have two options:
- Extend: Go to the trial license → Edit Metadata → clear or extend Expires At. The customer keeps their existing key.
- Replace: Revoke the trial key and generate a new non-trial license. Send the customer the new key.
Test / Sandbox Mode
Sandbox licenses let you integrate and test PermitCore without burning your plan's billing quota.
Test licenses work exactly like production licenses — validate, activate, floating seats,
feature flags, offline tokens — but their activations are never counted against
your MaxTotalActivations billing pool.
No separate sandbox environment is needed. Every tenant has a single environment with both live and test licenses. The filter in the license list defaults to Live only to keep your daily workflow clean.
Creating a test license
- Go to Licenses → Create License.
- Fill in the form as normal (product, max activations, expiry, features…).
- Before encrypting, toggle Test / Sandbox license on.
- Proceed through passphrase and generate as usual.
Identifying test licenses
Test licenses are visually distinguished throughout the admin panel:
| Location | Indicator |
|---|---|
| License list | Yellow Test badge next to the encrypted serial |
| License list filter | Dropdown: Live only (default) / Live + Test / Test only |
| License detail | Returned in LicenseDto.isTest = true via API |
Billing behavior
| Action | Live license | Test license |
|---|---|---|
| Activation | Counts against MaxTotalActivations pool | Never counted — always allowed regardless of plan limit |
| Validate | Standard | Identical — same response shape |
| Floating check-in/out | Standard | Identical |
| Billing dashboard | Shows current pool usage | Excluded from the displayed count |
IsTest flag is set at creation time and cannot currently be changed
after the license is saved. If you need to promote a test license to production,
revoke it and generate a new live license.
Version Management
Version management lets you enforce software build constraints per license. Set a Min Version and/or Max Version on any license key — customers running builds outside the allowed range are blocked when they call validate or activate.
MinVersion),
prevent customers on old support contracts from upgrading past a major version (set MaxVersion),
or pin enterprise customers to a specific release while you stabilise the next major version.
Setting version constraints
At creation time — fill in Min Version and/or Max Version in the Licenses → New License form. Both are optional; leave blank for no restriction.
On existing licenses — go to Licenses → View → Edit Metadata. Changes take effect immediately on the next API call from the customer's software.
Version range examples
| MinVersion | MaxVersion | Effect |
|---|---|---|
2.0.0 | — | Blocks all builds below 2.0.0 |
| — | 3.9.9 | Blocks all builds above 3.9.9 |
2.0.0 | 3.9.9 | Only 2.x and 3.x builds allowed |
3.0.0 | 3.0.0 | Pins to exactly version 3.0.0 |
| — | — | No restriction — any version passes |
Versions are parsed as MAJOR.MINOR.PATCH and compared numerically component-by-component (not as a lexicographic string compare), so 2.10.0 > 2.9.0 orders correctly. Any pre-release/build suffix (-beta1, +build5) is stripped before comparison.
How to send the version from your app
Pass the current software version in the JSON request body on both validate and activate:
curl -X POST https://api.permitcore.dev/api/v1/validate \
  -H "Content-Type: application/json" \
  -d '{"licenseKey":"PERMIT-XXXX-XXXX-XXXX-XXXX","version":"2.3.1","expectedProductId":"7f3e9a2b-1c4d-4e8f-9a6b-3d2c1e0f5a8b"}'
curl -X POST https://api.permitcore.dev/api/v1/activate \
-H "Content-Type: application/json" \
-d '{"licenseKey":"PERMIT-XXXX-XXXX-XXXX-XXXX","version":"2.3.1","nonce":"<from GET /api/v1/nonce>","expectedProductId":"7f3e9a2b-1c4d-4e8f-9a6b-3d2c1e0f5a8b"}'const res = await fetch('/api/v1/validate', { method: 'POST', headers: { 'Content-Type': 'application/json' }, body: JSON.stringify({ licenseKey: key, version: '2.3.1', // Optional — reject a key issued for a different product instead of silently accepting it expectedProductId: '7f3e9a2b-1c4d-4e8f-9a6b-3d2c1e0f5a8b', }), }); const data = await res.json(); if (!data.isValid && data.minVersion) { showError(`Please upgrade to v${data.minVersion} or newer.`); } else if (data.errorCode === 'WrongProduct') { showError(`This key is for a different product: ${data.productId}`); }
Blocked response
{
  "isValid":    false,
  "message":    "Version 1.9.0 is below the minimum required version 2.0.0",
  "productId":  "7f3e9a2b-1c4d-4e8f-9a6b-3d2c1e0f5a8b"
}
Note: the version-blocked response doesn't populate minVersion/maxVersion itself (they come back null) — parse the required version out of message, or call validate() without a version first to read the license's bounds directly.
If the customer sends no version at all, version constraints are skipped — the call proceeds as if there is no restriction. This ensures backward compatibility with apps built before you added version checks.
Version tracking in activations
The version string is stored on every Activation record. This lets you see which software builds your customers are running in the activation history and analytics — useful for planning deprecation timelines or identifying customers who need to upgrade.
Feature Flags
Feature flags let you control which parts of your software are unlocked for a given license — without issuing separate keys per edition. Instead of "License A = Basic" and "License B = Pro", you attach a list of feature strings to each license and check them at runtime.
features to ["export"], ["export","api"], or ["export","api","sso","white-label"] per license. Your code checks the list on every call.
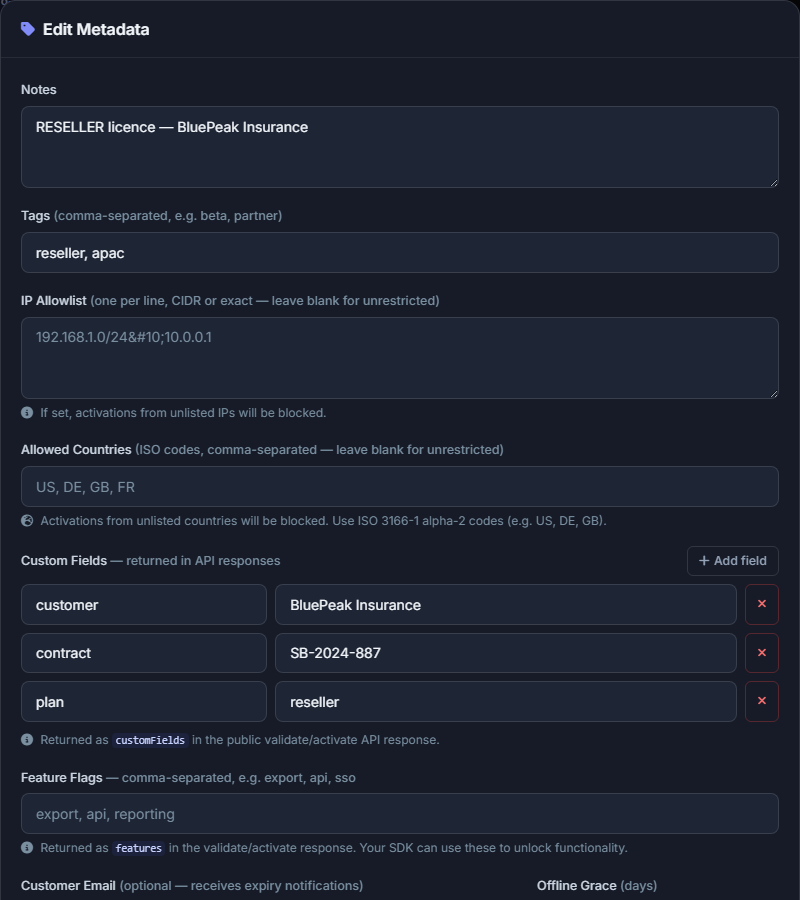
Feature flags configured in the Edit Metadata modal — comma-separated strings returned in every validate/activate response.
Setting feature flags
- Open Licenses → View → Edit Metadata
- Enter comma-separated feature names in the Feature Flags field (e.g.
export, api, sso) - Save — changes take effect immediately on the next API call
Use consistent lowercase feature names. Raw string comparisons are case-sensitive; some SDK helper methods compare case-insensitively. Grant access only after a valid license decision.
Reading feature flags in your app
const res = await fetch('/api/v1/validate', {
  method: 'POST', headers: { 'Content-Type': 'application/json' },
  body: JSON.stringify({
    licenseKey,
    expectedProductId: '7f3e9a2b-1c4d-4e8f-9a6b-3d2c1e0f5a8b', // optional
  }),
});
const data = await res.json();

if (!data.isValid) { /* reject */ }

const features = new Set(data.features ?? []);

if (features.has('export')) { enableExport(); }
if (features.has('api'))    { enableApiAccess(); }
if (features.has('sso'))    { enableSso(); }
data = requests.post('/api/v1/validate', json={
    'licenseKey': license_key,
    'expectedProductId': '7f3e9a2b-1c4d-4e8f-9a6b-3d2c1e0f5a8b',  # optional
}).json()

features = set(data.get('features') or [])

if 'export' in features:
    enable_export()
if 'sso' in features:
    enable_sso()
var httpResp = await http.PostAsJsonAsync("/api/v1/validate", new {
    licenseKey = key,
    expectedProductId = "7f3e9a2b-1c4d-4e8f-9a6b-3d2c1e0f5a8b" // optional
});
var resp = await httpResp.Content.ReadFromJsonAsync<LicenseResult>();
var features = resp?.Features?.ToHashSet() ?? [];

if (features.Contains("export")) EnableExport();
if (features.Contains("api"))    EnableApiAccess();
Common patterns
| Pattern | Feature strings | Notes |
|---|---|---|
| Tiered editions | basic, pro, enterprise | Check for the highest tier present |
| Module unlocks | export, api, sso, reports | Each feature is independent |
| Seat count in features | seats:10, seats:50 | Parse the value after the colon |
| Expiring beta access | beta | Combine with ExpiresAt for time-limited beta |
Offline Grace Period
The offline grace period lets your software continue working even when it cannot reach the PermitCore server — for example, when the customer has no internet, or your server is temporarily down. Set a number of days, and your SDK should cache the last successful validation response and treat it as valid for that duration.
Setting the grace period
- Go to Licenses → View → Edit Metadata
- Enter a number in the Offline Grace Days field (e.g.
7) - Save — the value is returned in every validate/activate response as
offlineGraceDays
Use signed offline grace
When offline grace is enabled, successful responses can include an ECDSA-signed offlineCacheToken with the pc_grace_v1 prefix. Official SDKs cache and verify this token when the service cannot be reached. Configure the SDK and its required cryptography dependencies; do not cache a bare JSON success and trust it later.
A custom implementation must validate token structure, signature, trusted public key, expiry, and matching license/device binding where applicable. Protect public-key distribution as part of your app's trust model. A public key loaded from the same untrusted cache as a token is not independently trustworthy. Do not use offline grace to override an explicit online rejection.
Use admin-issued offline activation for machines that cannot obtain an initial online validation.
Recommendations
| Scenario | Suggested grace period |
|---|---|
| Desktop app (typical internet user) | 7 days — covers a holiday or travel period |
| Server-side / always-online software | 0 or 1 day — connectivity expected |
| Air-gapped / industrial software | Use offline activation tokens instead |
| Mobile app | 3–7 days |
Named User Licensing
By default, PermitCore tracks how many activations a license has consumed and from where (IP address, country, device ID). Named user licensing goes one step further: it records who activated the license — the end user's email address.
This is especially useful for B2B software sold to companies where IT admins need to audit which employees are using which licenses. Instead of seeing "5 activations on 5 devices", you see "activated by [email protected] (2 devices), [email protected] (1 device), [email protected] (2 devices)".
Raw HTTP activation also requires a fresh nonce from GET /api/v1/nonce. The snippets here focus on device/user fields; use the complete activation flow when sending a request.
How to use it
Pass the optional userEmail field when calling POST /api/v1/activate:
{
  "licenseKey":          "PERMIT-A3K7-MN2P-QR9X-TZ5W",
  "deviceId":            "a3f8d2b1c9e4...",
  "deviceName":          "Alice-ThinkPad",
  "userEmail":           "[email protected]",
  "expectedProductId":   "7f3e9a2b-1c4d-4e8f-9a6b-3d2c1e0f5a8b"
}const response = await fetch('https://api.permitcore.dev/api/v1/activate', { method: 'POST', headers: { 'Content-Type': 'application/json' }, body: JSON.stringify({ licenseKey: key, deviceId: hwid, userEmail: currentUser.email, // pass the logged-in user's email expectedProductId: '7f3e9a2b-1c4d-4e8f-9a6b-3d2c1e0f5a8b' // optional }) });
Viewing named user data in the admin panel
Go to Licenses → View → Activation History. The table includes a User Email column that shows the email address recorded at activation time.
Key considerations
- Optional field — if
userEmailis omitted, the activation is recorded without a user email. Licenses without it still work normally. - Not enforced — PermitCore does not restrict one email to one seat; it records the field for reporting only. Enforce seat limits via MaxActivations.
- Max 256 characters — the field is truncated server-side if longer.
- Immutable after activation — the email is stamped at activation time and not updated on re-activation.
License Templates
If you create many licenses with the same configuration — same max activations, same expiry, same feature flags — License Templates let you save that configuration once and apply it in one click when creating new licenses.
Creating a template
- Go to Templates in the left sidebar (or navigate to
/templates) - Click New Template
- Fill in the fields you want to pre-populate:
- Name — e.g. "Pro Annual", "Starter Trial", "Enterprise Seat"
- Max Activations — default 1
- Expires After (days) — leave blank for never-expiring licenses
- Version Range — MinVersion / MaxVersion to lock the template to specific software versions
- Activation Period (days) — sliding window from first activation
- Trial — check if this is a trial template and enter the trial duration
- Notes — internal description for your team
- Click Save Template
Template API
| Method | Endpoint | Description |
|---|---|---|
GET | /api/templates | List all templates for the tenant |
GET | /api/templates/{id} | Get a single template |
POST | /api/templates | Create a new template |
PUT | /api/templates/{id} | Update a template |
DELETE | /api/templates/{id} | Delete a template |
All template endpoints require a CompanyAdmin JWT token (Authorization: Bearer <token>).
{
  "name":                 "Pro Annual",
  "maxActivations":       5,
  "expiresAfterDays":     365,
  "isTrial":             false,
  "trialDays":           0,
  "minVersion":          "2.0.0",
  "maxVersion":          "3.9.9",
  "activationPeriodDays": null,
  "featuresJson":        "[\"export\",\"api\",\"pro\"]",
  "notes":               "Pro plan annual — 5 seats, expires 1 year from issue"
}License Transfer
When a customer needs to move their license to a new device — because their hardware was stolen, replaced, or they changed jobs — License Transfer lets you instantly reset all activations so the license can be used on new machines.
What transfer does
- Deletes all existing activation records for the license
- Resets
CurrentActivationsto0 - Leaves the license key itself unchanged — the customer reuses the same key
- Logs the action in the Activity Log with the number of activations cleared
How to transfer (admin panel)
- Go to Licenses → View for the license
- In the Activation History header, click Transfer (blue button)
- Confirm in the dialog — all activations are cleared immediately
- Give the customer their existing key — they can activate on new devices
Transfer API
curl -X POST https://api.permitcore.dev/api/licenses/{id}/transfer \
  -H "Authorization: Bearer <admin-token>"
No request body required. Response:
{
  "message": "License transferred: 3 activation(s) cleared."
}Transfer vs. Reset Activations
| Transfer | Reset Activations | |
|---|---|---|
| Purpose | Customer moves to new hardware | Admin maintenance / troubleshooting |
| Effect | Clears activations, keeps key | Clears activations, keeps key |
| Audit log entry | Yes — "TransferLicense" | Yes — "ResetActivations" |
| Semantic difference | Customer-facing workflow | Admin-facing workflow |
Node-locked / HWID Licensing
Node-locked licensing ties a license key to a specific device (hardware fingerprint). This is useful for single-machine perpetual licenses where you want to prevent one key from being shared across multiple computers.
How it works
Enable Node Locked when creating a license (or update it after creation). Then in your application:
- Generate a device fingerprint — a stable SHA-256 hex string identifying this install. Prefer your SDK's built-in helper (see below) over hashing raw hardware identifiers.
- Pass it as
deviceIdwhen callingPOST /api/v1/activate— or just omit it if you're using an SDK, and it's collected automatically - Optionally pass a human-readable
deviceName(e.g. "John-MacBook-Pro")
{
  "licenseKey":         "PERMIT-A3K7-MN2P-QR9X-TZ5W",
  "deviceId":           "a3f8d2b1c9e4...",
  "deviceName":         "John-MacBook-Pro-M3",
  "expectedProductId":  "7f3e9a2b-1c4d-4e8f-9a6b-3d2c1e0f5a8b"
}
Raw HTTP activation also requires a fresh nonce from GET /api/v1/nonce. The snippets here focus on device/user fields; use the complete activation flow when sending a request.
Re-installation is free
When a license is node-locked, re-activating from the same device ID does not consume an additional activation slot. The server recognises the device and counts it as a re-activation rather than a new registration. This means customers can reinstall their OS without using up activations — as long as the hardware fingerprint stays the same.
Choosing a device fingerprint
PermitCore is fingerprint-agnostic — it accepts any stable SHA-256 hex string as deviceId
and never generates or interprets it. Use your SDK's built-in helper first — the
.NET, Python, Node.js, and PHP SDKs ship a GetHardwareId() / get_hardware_id()
helper that's called automatically whenever deviceId is omitted from activate()/
checkout(). It deliberately avoids hashing raw CPU serial, disk serial, or MAC address —
those are unstable (cloned on VM snapshots, changed on hardware upgrades, unavailable in containers)
and needlessly sensitive to collect. Instead it combines a few low-volatility attributes (hostname, OS,
architecture) with a random seed persisted to a local file on first run.
| SDK | Helper | Persisted seed location |
|---|---|---|
| .NET | PermitCoreClient.GetHardwareId() | %APPDATA%\.permitcore_seed |
| Python | PermitCoreClient.get_hardware_id() | ~/.permitcore_seed |
| Node.js | PermitCoreClient.getHardwareId() | ~/.permitcore_seed |
| PHP | PermitCoreClient::getHardwareId() | system temp dir (weaker isolation — avoid relying on it on shared hosting) |
| Java / C++ | none yet | pass your own deviceId |
Persist the installation identity
Use your SDK helper where available. For custom clients, generate an installation identifier once, persist it in the application's protected configuration, and send the same device ID on future activations. Reinstalling or deleting its seed may change that ID. Do not derive a supposedly stable identity from whichever network adapter happens to be returned first.
Node-locked vs. count-based — choosing the right mode
| Scenario | Recommended mode |
|---|---|
| Desktop app, single-machine perpetual license | Node-locked (Max Activations = 1–2) |
| Desktop app, allow use on 2–3 personal devices | Count-based (Max Activations = 2–3) or Node-locked (Max Activations = 2–3) |
| SaaS, web app, or mobile app | Count-based — device ID is not meaningful |
| CI/CD or server software (multiple machines) | Count-based with a higher activation limit |
| Floating / concurrent license | Use the Floating License type — HWID not applicable |
Managing device activations in the admin panel
- Go to Licenses and click View on a node-locked license
- Scroll to the Active Devices table — each row shows Device ID, Device Name (if provided), and activation timestamp
- Click the Deactivate button next to any row to remove that machine's activation
- The activation counter decrements immediately, freeing up a slot for the customer to use on a new machine
Deactivation API (programmatic)
Your application can let customers self-deactivate through the anonymous customer portal API (e.g. a "Deactivate this machine" button in Settings). First look up the license to get the activationId of the device to remove, then deactivate it by that ID:
// Request body
{
  "licenseKey": "PERMIT-A3K7-MN2P-QR9X-TZ5W"
}

// Response 200 OK — activations[].id is what you need below
{
  "productName": "Task Manager Pro",
  "activations": [
    { "id": "3b4c9f2a-1e7d-4a8f-9c2b-...", "deviceName": "John-MacBook-Pro-M3", "activatedAt": "2026-06-01T00:00:00Z" }
  ]
}
// Request body
{
  "licenseKey":   "PERMIT-A3K7-MN2P-QR9X-TZ5W",
  "activationId": "3b4c9f2a-1e7d-4a8f-9c2b-..."
}

// Response: 204 No Content on success (empty body)
Both endpoints are unauthenticated (identified by the license key itself) and always take the key/ID in the POST body — never the URL — to keep them out of access logs. After deactivation the customer can activate the key on a new machine; the activation counter is decremented server-side.
POST /api/v1/portal/{tenantSlug}/deactivate/request-otp first and pass the returned
otpToken plus the code the customer enters as otpCode on the deactivate call above;
at "Account required" this endpoint returns 403 outright and you'll need the authenticated
/account/licenses/{licenseId}/deactivate endpoint instead. Most vendors stay on the
default and never need this.
Post-Expiry Grace Period
A post-expiry grace period lets a license remain valid for a configurable number of days
after its ExpiresAt date. This is useful for customers who are in the
process of renewing — it prevents a hard cutoff at the exact expiry moment.
How it works
- Set
PostExpiryGraceDayson a license at creation time (or via Edit License). - After
ExpiresAt,POST /api/v1/validateandPOST /api/v1/activatestill returnisValid: true. - The response includes
"isInGracePeriod": trueso your app can show a renewal reminder. - Once the grace period is exhausted, the key behaves as expired (
isValid: false).
Validate response during grace period
POST /api/v1/validate
{ "licenseKey": "PERMIT-XXXX-XXXX-XXXX-XXXX", "expectedProductId": "7f3e9a2b-1c4d-4e8f-9a6b-3d2c1e0f5a8b" }

→ {
  "isValid": true,
  "isInGracePeriod": true,
  "expiresAt": "2026-05-01T00:00:00Z",
  "message": "License is valid",
  "productId": "7f3e9a2b-1c4d-4e8f-9a6b-3d2c1e0f5a8b"
}
Setting grace days
Enter a value (e.g. 7) in the Post-Expiry Grace Days field when creating or editing a license. For Store subscriptions, blank inherits Store payment grace (14 days by default), applied while past_due or unpaid; zero disables that grace. Other licenses have no post-expiry grace when the field is blank.
Maintenance / Annual Support Period
Maintenance expiry covers the classic desktop ISV model: a customer buys a perpetual license (activates forever) but only receives software updates and support while their annual support contract is active.
How it works
Set MaintenanceExpiresAt on a license. The validation response always includes
this date. Your SDK or application logic decides what to do with it — typically blocking
upgrades to versions released after the maintenance expiry date.
Validate response
POST /api/v1/validate
{ "licenseKey": "PERMIT-XXXX-XXXX-XXXX-XXXX", "expectedProductId": "7f3e9a2b-1c4d-4e8f-9a6b-3d2c1e0f5a8b" }

→ {
  "isValid": true,
  "maintenanceExpiresAt": "2027-01-15T00:00:00Z",
  "message": "License is valid",
  "productId": "7f3e9a2b-1c4d-4e8f-9a6b-3d2c1e0f5a8b"
}
Recommended SDK pattern
var result = await client.ValidateAsync(key, expectedProductId: Guid.Parse("7f3e9a2b-1c4d-4e8f-9a6b-3d2c1e0f5a8b"));
if (result.IsValid && result.MaintenanceExpiresAt.HasValue
    && result.MaintenanceExpiresAt.Value < DateTime.UtcNow)
{
    // Block upgrade — maintenance expired. Allow running current version.
    ShowMessage("Your maintenance plan has expired. Upgrade to re-enable updates.");
}Setting maintenance expiry
Pick a date in the Maintenance Expires At field in the Create License form. For perpetual licenses, leave ExpiresAt blank and only set MaintenanceExpiresAt.
License Bundles Professional+
A bundle groups multiple products under a single license key. When a customer activates their bundle key, the API response includes every product they're entitled to — without issuing separate keys for each product.
bundleProducts array to know which modules to unlock.
Creating a bundle
- Go to Bundles in the sidebar.
- Click New Bundle, give it a name, and select at least 2 products.
- Save. The bundle now appears as a selectable product type when creating license keys.
Validate / Activate response
{
  "isValid": true,
  "productName": "Acme Suite",
  "productId": "7f3e9a2b-1c4d-4e8f-9a6b-3d2c1e0f5a8b",
  "bundleProducts": [
    { "productId": "...", "productName": "Acme Video" },
    { "productId": "...", "productName": "Acme Audio" },
    { "productId": "...", "productName": "Acme Export" }
  ]
}
productId is the key's own primary product; bundleProducts is a list of every product the bundle key unlocks (each an object with productId + productName, not plain strings). Prefer stable productId values for entitlement checks; names can change.
SDK pattern
var result = await client.ValidateAsync(licenseKey);
if (result.IsValid)
{
    var products = result.BundleProducts?.Select(p => p.ProductName) ?? Enumerable.Empty<string>();
    if (products.Contains("Acme Video")) EnableVideoModule();
    if (products.Contains("Acme Audio")) EnableAudioModule();
}
Constraints
- A bundle requires at least 2 products.
- Deleting a bundle is blocked if active license keys exist for it.
- Bundle keys can be sold via the License Store — customers see the bundle as a single product with all included items listed.