License Store
Before you open your store
The License Store sells keys for your products using your vendor Stripe account. Create an internal product first, then configure payment credentials, the license issued after checkout, and the details shown to buyers.
Work through a test purchase before sharing the store. Confirm that checkout, payment webhooks, license delivery, invoice details, and cancellation behavior all match your sales model. Use matching Stripe test credentials throughout that test.
For your own PermitCore subscription and account exports, see Account & team. For license lookup and device self-service, see the Customer portal.
License Store
The License Store lets your customers buy licenses directly from a branded public storefront — no coding required on your end. A customer account is required to check out (see "Customer Accounts" below); PermitCore hosts the checkout page and automatically creates a license key when payment succeeds, emailing the buyer a link to sign in and view it from their account rather than the key itself. You connect your own Stripe account, so revenue goes directly to you with 0% PermitCore commission.

A Store 2.0 storefront at /store/{yourSlug} with vendor navigation, hero slides, editorial collections, search, and responsive layouts.
How it works
https://permitcore.dev/store/yourSlug. Add it to your website, email footer, or documentation.Complete setup tutorial
Use this sequence for a new store. It separates payment setup, product fulfillment, presentation, and launch verification so each layer can be tested before customers see it.
1. Prepare the vendor account and Stripe
- Create the software product that the purchased license will belong to.
- Open License Store → Settings and enable the Store.
- Add Stripe publishable, secret, and webhook signing keys from the same Stripe mode: all test or all live.
- Add the vendor legal name, VAT number, default tax rate, and any country overrides used on invoices.
- Create the webhook shown below and enable every required event before accepting an order.
2. Create the product customers will buy
- Open License Store → Products → Add Product and link the correct internal product.
- Write the public name, short tagline, card description, long product-page description, and up to six feature bullets.
- Upload a clear landscape cover image and, where useful, a product gallery. Every active product should have an image before launch.
- Choose one-time, monthly, and/or annual pricing and select the currency.
- Configure the generated license: activation count, node locking, expiry, trial days, and feature flags.
- Add an optional badge, CTA label, featured state, bundle contents, or free trial.
- Save, then use Auto-Setup Stripe Products in Store Settings to create missing Stripe Products and Prices.
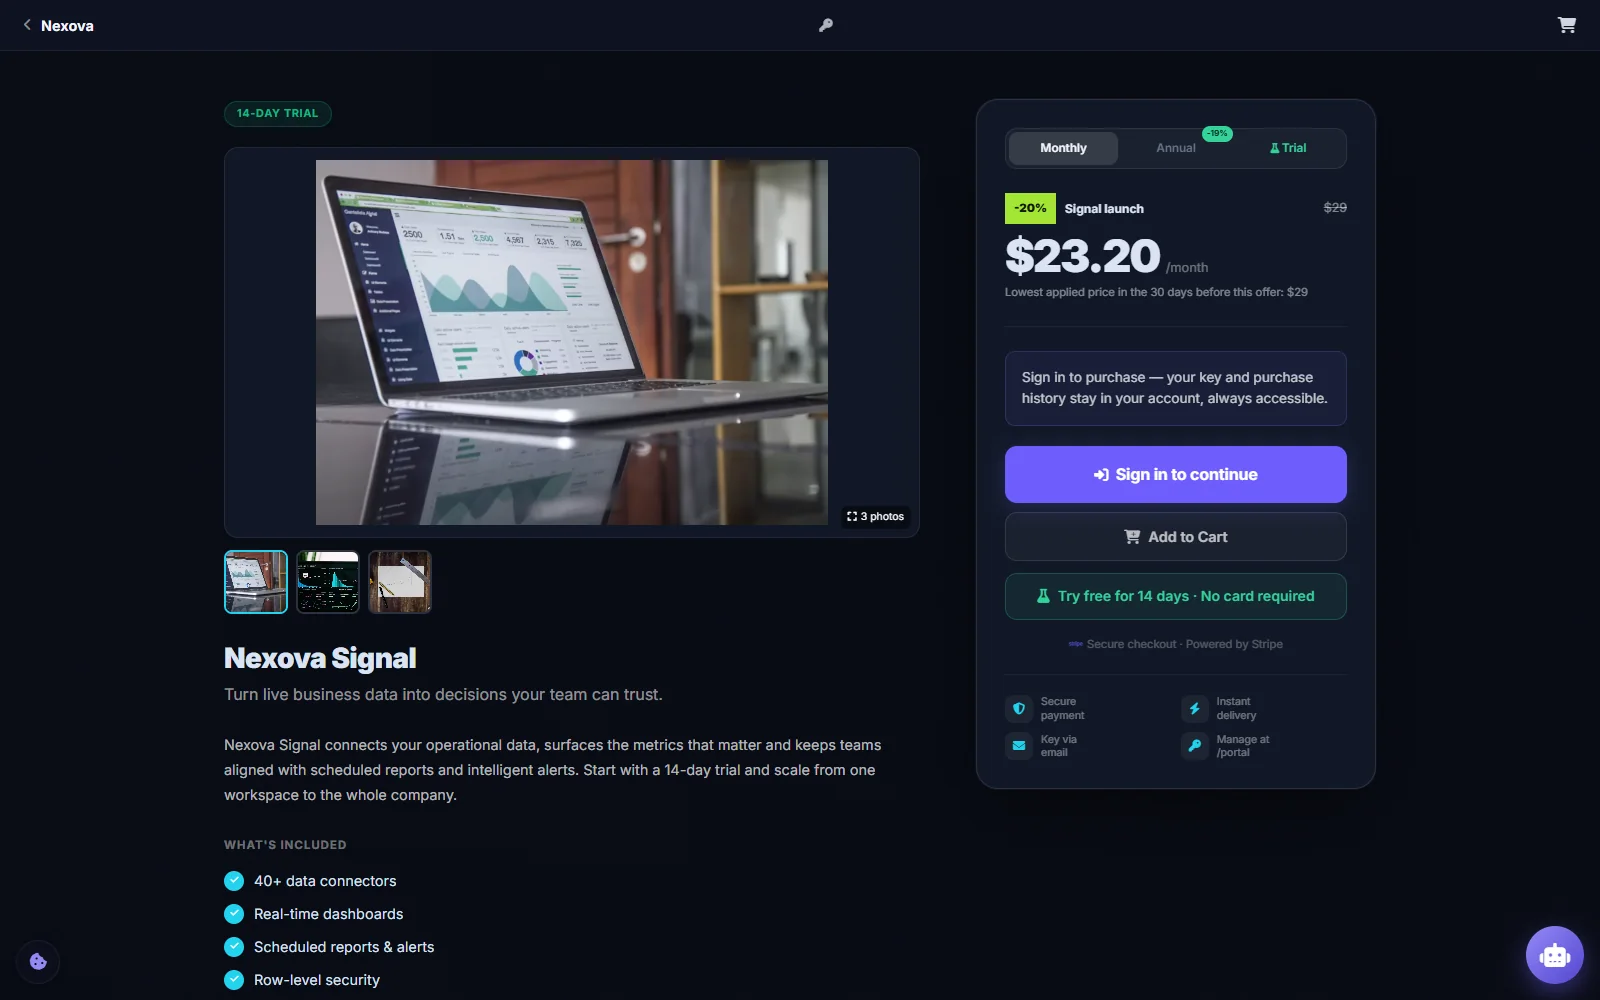
The resulting product page combines a gallery, description, features, pricing choices, trial, discount disclosure, cart, and secure checkout.
3. Build the visual identity in Shop Designer
- Open License Store → Shop Designer.
- In Branding, set the store name, logo, primary/accent colors, text colors, page background color, and optional page background image.
- In Visual Style, choose the heading font, card density, hero height, corner style, and desktop product columns.
- Configure the default category-tile color or image. Then edit each visible tile—such as Featured, Special offers, Free trials, Bundles, or a product badge—to override its own background color or image. Select Use default to remove an override.
- Add hero slides with desktop-safe images, headline, supporting copy, CTA label, and a safe internal or HTTPS destination.
- Use the live preview at desktop, tablet, and phone widths before saving.
4. Compose the homepage
Under Homepage Sections, add the blocks that tell the product story. The section list is the published page order.
- Add a Featured spotlight for the strongest product story.
- Add horizontal shelves for offers, trials, bundles, badges, or products under a selected price.
- Add Category tiles for fast discovery and Discovery tabs for compact comparison.
- Keep a Product catalog so every active product remains searchable and sortable.
- Use the up/down arrows to reorder sections and the Visible switch to prepare a block without publishing it.
- Set Space above and Space below independently from 0–160 px. New sections start with a balanced 32 px top gap; reduce a gap when two related blocks should read as one group.
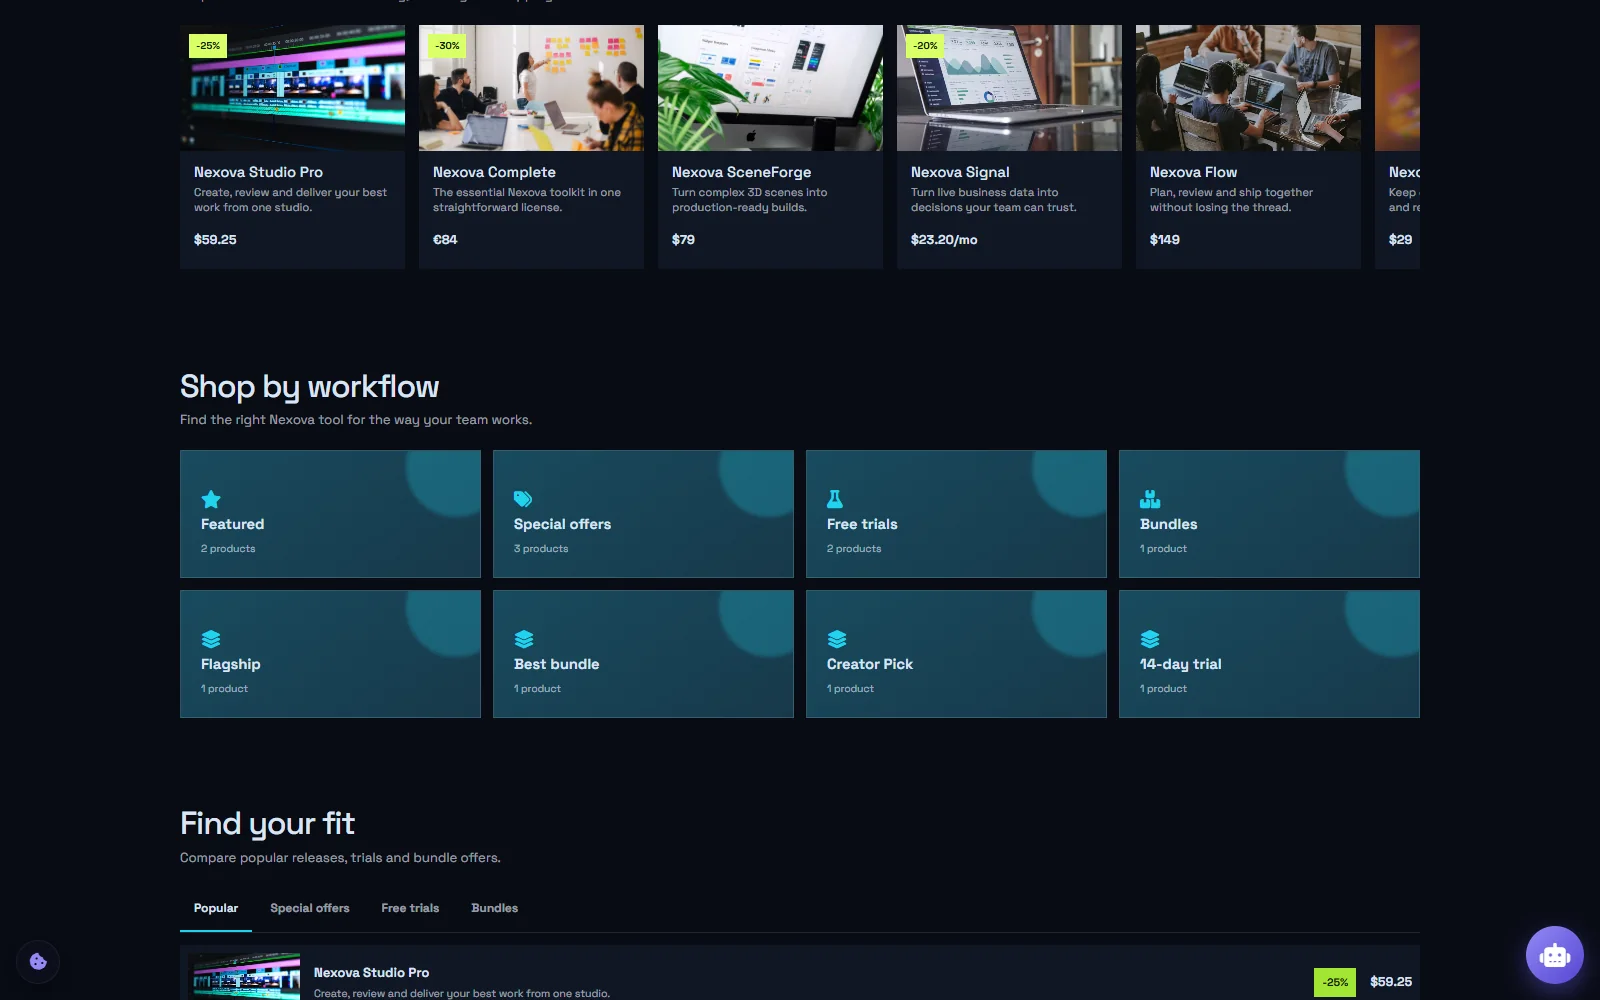
Collections, individually branded category tiles, and discovery tabs make a larger catalog easy to scan.
5. Configure offers without weakening checkout
- Open a Store Product and create a discount campaign with a name, percentage, label color, UTC start, and UTC end.
- Leave Show lowest price in the previous 30 days enabled when the disclosure is useful or required for the product and market.
- Preview the crossed-out regular price, colored percentage badge, campaign label, effective price, and 30-day comparison text.
- Test at least one cart and Stripe test checkout. The API—not browser state—selects the currently valid campaign and calculates the effective price.
6. Run the launch test
- Check the homepage, product page, cart, sign-in, account, invoices, and license view on desktop and a real mobile viewport.
- Buy one one-time item, start one trial, and test a recurring product if the store offers subscriptions.
- Confirm the Stripe webhook creates exactly one order and license, even if Stripe retries the event.
- Verify the issued license has the intended activation and feature settings.
- Cancel a test subscription and confirm the linked license follows the configured lifecycle.
- Review every product image, CTA, currency, tax rule, vendor invoice detail, and external link before switching to live Stripe credentials.
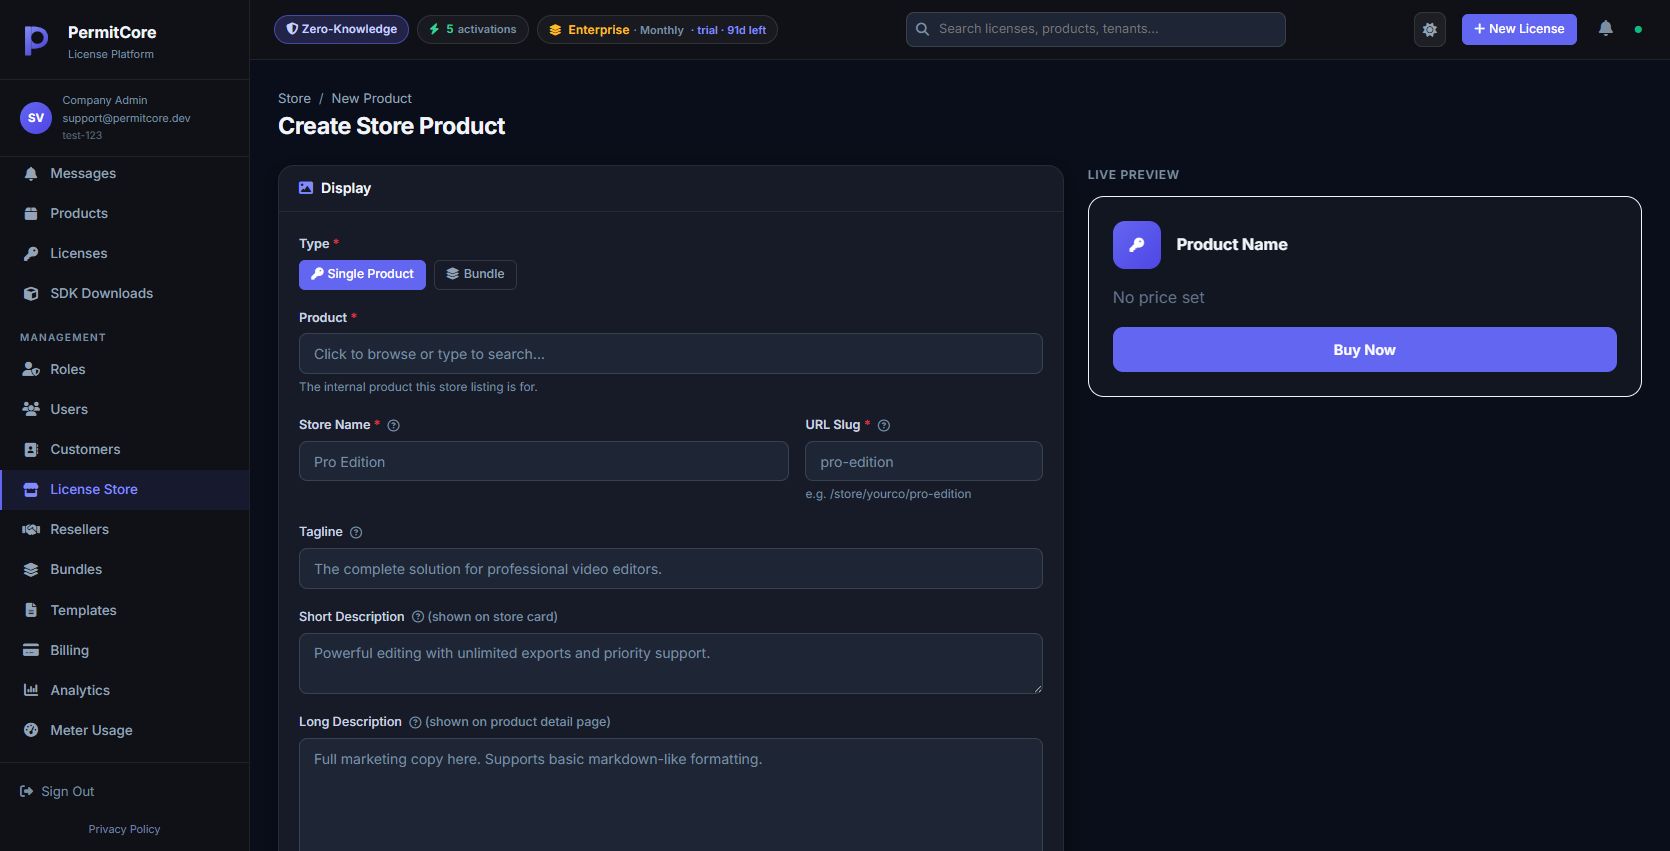
The Create Store Product form before entry, with display fields and a live preview. Pricing and generated-license settings continue below.
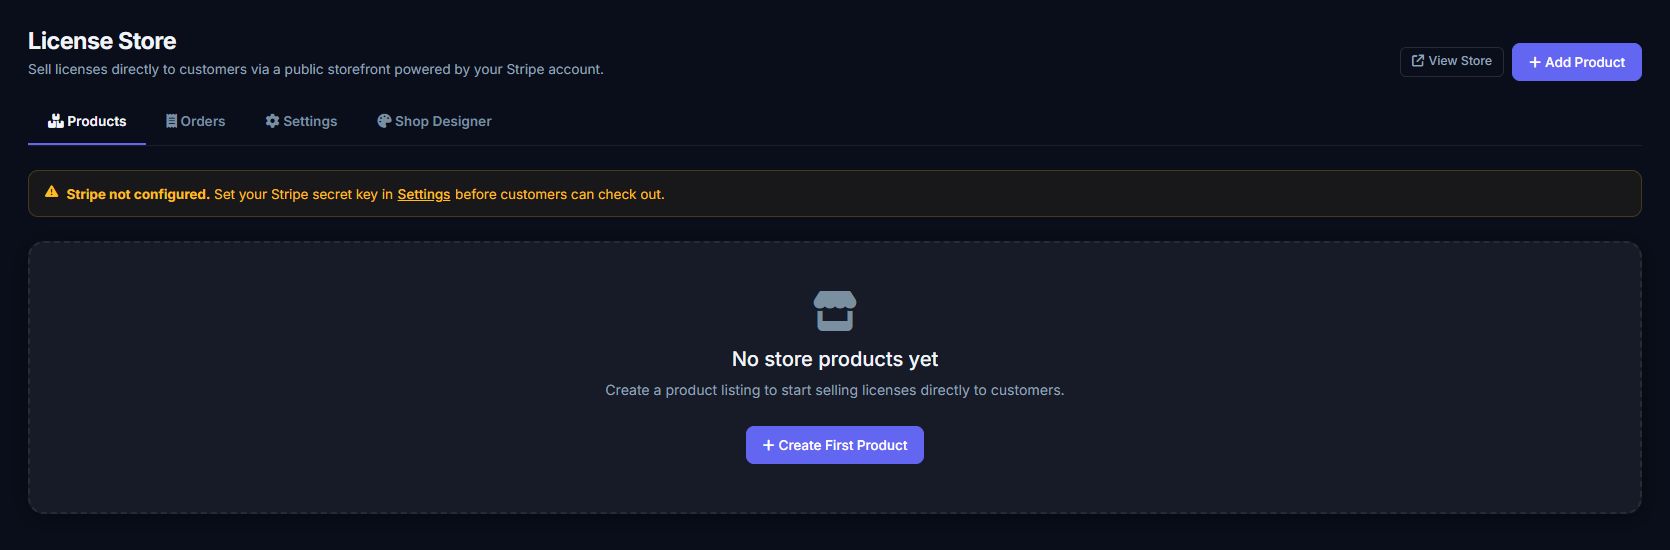
A new Store before setup: Products, Orders, Settings, and Shop Designer. Add a product and configure Stripe before accepting purchases.
After creating your store products, click Auto-Setup Stripe Products in Store → Settings. PermitCore automatically creates the matching Stripe Products and Prices in your Stripe account and stores the Price IDs. You never need to copy-paste price_xxx IDs manually. Re-running the setup is safe — prices that haven't changed are skipped.
Store product settings
| Setting | Description |
|---|---|
| Name & Slug | Display name and URL identifier (e.g. /store/yourco/pro-edition) |
| Tagline & Description | Short marketing text shown on the product card |
| Long Description | Full marketing copy shown on the product detail page |
| Feature Bullets | Up to 6 bullet points shown on the card and detail page (e.g. "Unlimited exports") |
| Pricing | One-time, monthly, and/or annual prices. Set at least one. Currency selectable. |
| Stripe Price IDs | Auto-filled by "Auto-Setup Stripe Products" button, or enter manually for recurring subscriptions managed directly in Stripe. |
| Badge | Optional label on the card (e.g. "Most Popular") with custom color |
| Generated license | Max activations, node locking and feature flags apply to purchased keys. One-time purchases use configured expiry days; subscriptions use the paid Stripe billing period. Free trial claims use trial days. |
| Featured | Featured products are shown larger at the top of the store grid |
| Discount campaign | Schedule a 1–90% discount with start/end time, campaign name and color. The server applies the effective price at checkout. |
| Lowest price disclosure | Optional checkbox, enabled by default, showing the lowest applied price during the 30 days before the campaign started. Price history is recorded even when the label is hidden. |
Shop Designer reference
Store → Shop Designer is organized as a visual page builder. Branding controls the shared visual system and full-page background; Visual Style controls typography, hero height, card density and desktop columns; Category Tiles adds per-tile artwork; Homepage Sections controls page order, content, visibility, and spacing.
| Section | Use it for | Available controls |
|---|---|---|
| Featured spotlight | One large editorial product story with a selectable rail. | Title, subtitle, product filter, maximum items, visibility and order. |
| Horizontal shelf | Fast, touch-friendly browsing similar to a marketplace collection. | All/featured/trial/bundle/badge/under-price filter and maximum items. |
| Category tiles | Shortcuts generated from featured items, offers, trials, bundles and product badges. | Title, subtitle, visibility, order, shared fallback style, and a color/image override for each visible tile. |
| Discovery tabs | Compact lists for popular products, offers, trials and bundles. | Title, subtitle, maximum items, visibility and order. |
| Product catalog | The searchable and sortable card grid. | Title, visibility, order and global products-per-row setting. |
Every section also has independent Space above and Space below controls. Use the arrow controls to reorder sections and the Visible switch to prepare a section without publishing it. If the catalog is removed, PermitCore still adds a safe catalog fallback so products never become impossible to browse.
Discounts and the EU 30-day rule
PermitCore stores regular and promotional price events and calculates the comparison period from the 30 days immediately before a campaign starts. The promotional price itself is excluded, so it cannot become its own “lowest price.” Display and checkout use the same percentage and UTC schedule, but checkout always recalculates on the server.
Store security and performance
- Server-authoritative checkout: browser cart prices are display-only. The API reloads the active product, price type, campaign and tax before creating Stripe Checkout.
- Payment boundary: card details are entered on Stripe Checkout. PermitCore stores encrypted vendor credentials and issues a paid license only after verifying the tenant-specific Stripe webhook signature.
- Tenant isolation: store products, customers, orders, designs and price history are protected by tenant filters and PostgreSQL Row-Level Security.
- Safe customization: colors, image URLs and slide links are validated; legacy rows are sanitized again on public read; Enterprise CSS blocks network loads and executable/breakout constructs.
- Traffic resilience: public catalog/product responses use shared Valkey caching and dedicated browse rate limits; checkout and trial endpoints use stricter limits. Cache failure falls back to PostgreSQL.
- Responsive storefront: grids collapse for tablets/phones, shelves remain horizontally scrollable, controls are touch-sized and reduced-motion preferences are respected.
Stripe webhook setup
In your Stripe Dashboard, create a webhook endpoint pointing to:
https://api.permitcore.dev/api/store/webhook/yourSlug
Enable these events: checkout.session.completed, payment_intent.payment_failed, checkout.session.expired, invoice.paid, invoice.payment_failed, customer.subscription.updated, customer.subscription.deleted, charge.refunded
Subscription renewals & past_due
For monthly and annual Store purchases, a paid Stripe subscription invoice extends the existing license to the end of its paid billing period. The customer keeps the same key. expiresAt is the paid-through date, not the grace deadline.
A failed renewal sets paymentStatus to past_due. Validation and activation continue through the configured payment grace window: 14 days by default, measured from the paid-through date. Vendors can set 0–365 days in Store → Settings; a license's explicit PostExpiryGraceDays takes precedence, including zero. unpaid keeps the same deadline. Once it is reached, access expires. A successful payment restores active and advances the paid-through date.
During payment grace, the response includes isInGracePeriod: true and paymentStatus: "past_due" or "unpaid". Show a card-update notice while isValid remains true. Non-subscription licenses return no payment state. Offline cache tokens and newly generated offline activation tokens for Store subscriptions are capped at paid-through plus grace. Reconnect to receive a refreshed signed cache token after payment; already-issued offline tokens retain their signed deadline and cannot learn about a cancellation while disconnected.
Scheduling cancellation at period end preserves access through that paid period. When Stripe ends the subscription, customer.subscription.deleted revokes the license. Duplicate invoices and webhook deliveries have no additional effect; older payments never shorten the paid period or reactivate a revoked key.
Register invoice.paid, invoice.payment_failed, and customer.subscription.updated alongside checkout.session.completed, payment_intent.payment_failed, checkout.session.expired, customer.subscription.deleted, and charge.refunded on the vendor's Store webhook endpoint. This is the customer's Store subscription; the vendor's own PermitCore billing is managed separately.
Copy the webhook signing secret and paste it into Store → Settings → Webhook Secret.
If you sell a monthly or annual store product, PermitCore listens for customer.subscription.deleted and automatically deactivates the license when the customer's Stripe subscription ends — no manual revoke needed. Register this event alongside the renewal events so cancellation, paid-through, and payment grace stay synchronized.
Tax & Pricing
Choose the tax calculation mode in Store → Settings → Tax.
| Mode | How it works |
|---|---|
| Vendor rates | Your default and per-country rates, with the existing country/VAT fields in the cart. Existing stores retain this mode until you change it. |
| Stripe Tax | Stripe calculates tax from the buyer's address, product tax code and your active registrations. You remain the seller. New stores start with this mode; complete Stripe Tax settings and your origin address before enabling checkout. |
| Managed Payments | For eligible direct Stripe accounts and digital products, Stripe acts as merchant of record and handles its tax and invoicing responsibilities. Stripe validates availability when creating checkout. |
Product settings select a Stripe tax code (default txcd_10103001, SaaS for business use)
and exclusive pricing (tax added to the price) or inclusive pricing (tax included).
Provider-calculated tax applies to single purchases, carts and subscriptions created with that mode.
Existing subscriptions retain their original Stripe tax configuration and price behavior.
In Stripe modes, billing and business tax details are collected securely at Stripe Checkout. The final tax and total are shown before payment. Stripe Tax collects tax where the vendor has active registrations; a zero-tax result can be correct where no registration applies. If the selected tax setup is unavailable, checkout stops with a clear message. Switching to Vendor rates is an explicit vendor choice.
Business tax IDs and reverse charge
Stripe Tax collects supported business tax IDs and applies reverse-charge treatment where Stripe's tax rules determine it applies. PermitCore records the tax treatment reported by Stripe rather than inferring exemption merely from a zero amount. Vendor rates retains its separate EU VAT/VIES workflow; it is not used for Stripe-calculated tax.
Paid invoice events record actual tax, total, buyer country and business tax ID. Duplicate deliveries do not duplicate invoice records, and an older invoice cannot replace the latest paid figures.
B2B Invoicing
Paid Stripe purchases prefer the Stripe invoice PDF. HTML invoices remain available for trial and legacy orders and use the recorded financial figures. Invoices include your vendor details, the buyer's details, a line-item breakdown, tax treatment, and a reverse-charge notice when applicable.
Setup: your vendor details
Before invoices are meaningful, add your company details in Store → Settings → Invoicing:
| Field | Description |
|---|---|
| Legal Company Name | Your registered company name — printed as "Sold by" on every invoice. |
| Your VAT Number | Your own VAT registration number — printed on invoices for B2B compliance. |
Cart fields collected from buyer
| Field | Required | Description |
|---|---|---|
| Company Name | Optional | Printed on the invoice as "Buyer company". Leave blank for personal purchases. |
| Billing country/address | Required in Stripe modes | Collected by Stripe Checkout for provider tax calculation. Vendor rates retains the cart country selector. |
| Business tax ID | Where supported | Collected by Stripe in provider modes; tax treatment follows Stripe. Vendor rates retains the EU VAT field. |
Accessing invoices
| Who | How |
|---|---|
| Admin | Store → Orders → click Invoice next to any order. Opens the Stripe invoice when available. Invoice history keeps each renewal document and tax amount. |
| Customer | My Account → Orders → click Invoice next to any order. The authenticated account also lists Stripe invoice history, preserving earlier renewal documents. |
window.print().
Use your browser's Save as PDF option in the print dialog to get a PDF copy.
Keep a downloaded copy for your accounting records.
Customer Accounts (My Account)
A store account is required to buy anything — including a free trial. Browsing products and adding to cart needs no account, but the checkout/trial button always requires sign-in first: an unauthenticated buyer is prompted to sign in or register (returning straight back to the product/cart afterward) before payment even starts. This is deliberate, not a gap that got closed by accident — a purchase with nowhere to log into afterward had no way to ever see the key/activations again except contacting you directly. Accounts are per-store (each vendor's store has its own account system, distinct from the separate, always-anonymous Customer Portal).
Registration & Login
A Sign In button appears in the store header. Customers can register with name, email, password, and optional address. After registration, a verification email is sent automatically.
| Page | URL | Description |
|---|---|---|
| Login | /store/{slug}/login | Sign in with email + password. Includes "Forgot password?" link and a "Resend verification email" prompt if the account isn't verified yet. |
| Register | /store/{slug}/register | New account: name, email, password, country, address. |
| My Account | /store/{slug}/account | Tabs: My Orders (purchase history, invoices), My Keys (every license linked to the account — purchase date, expiry, activation/device list, "Add a license" to self-link one you hold the key for), Profile, Security. |
Email verification
After registering, customers receive a verification link valid for 48 hours. Until verified, a yellow banner is shown in My Account with a Resend link — also reachable directly from the Login page's error message if a customer tries to sign in before verifying. Verification is not required to buy — sign-in alone is enough; verification is a separate, softer reminder shown after the fact.
/store/yourSlug/verify-email?token=token
Forgot / Reset password
The login page has a Forgot password? link. The customer enters their email and receives a reset link valid for 1 hour. For security, the forgot-password endpoint always returns HTTP 200 regardless of whether the email exists (prevents email enumeration).
/store/yourSlug/reset-password?token=token
What customers can do in My Account
| Tab | Features |
|---|---|
| Orders | Full order history with product name, date, amount. Click Reveal Key to decrypt and display the license key. Click Invoice to open a printable invoice. |
| Profile | Update name, email, country, and address. |
| Security | Change password. Email verification status badge + Resend button if not yet verified. |
End-Customer Expiry Notifications
PermitCore can send expiry reminder emails directly to your end customer — not just to you as the admin. When a Customer Email is set on a license, that address receives branded reminder emails at 30, 7, and 1 day before the license expires, prompting the customer to renew.
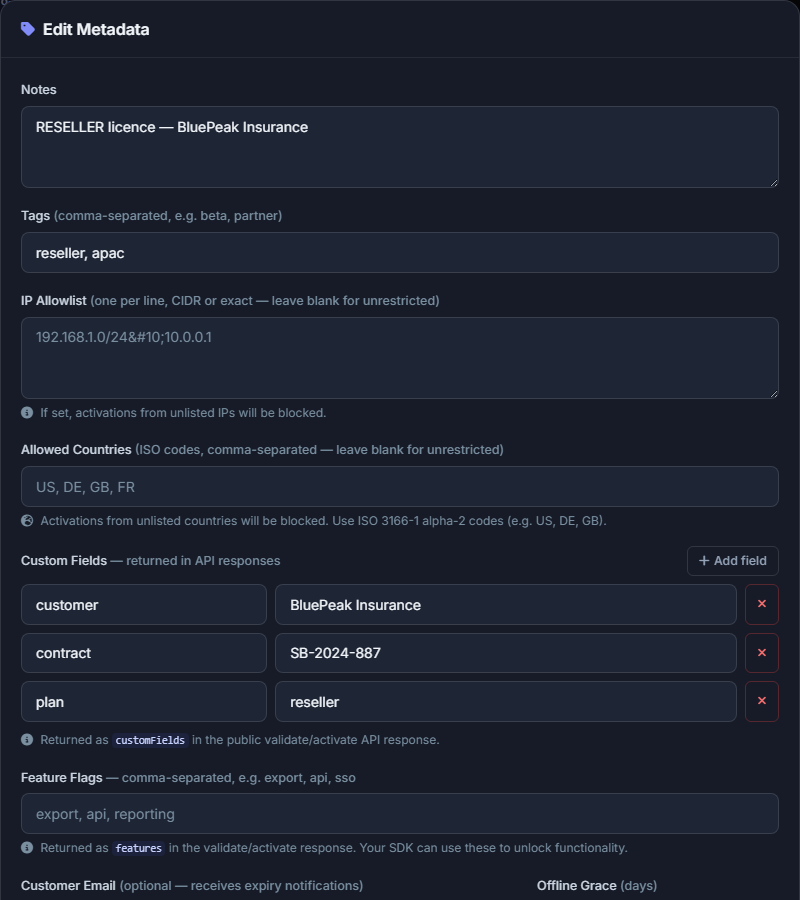
The Customer Email field in the Edit Metadata modal — set per license, completely optional.
How to set it up
- Go to Licenses → View → Edit Metadata
- Enter the customer's email in the Customer Email field
- Save — the email will be used for all future expiry notifications for this license
Setting a Customer Email does not replace admin notifications — admins still receive their daily digest. This is an additional, per-license notification that goes directly to the end user.
The customer email
The email sent to the customer:
- Is delivered using the instance's configured mail provider
- Shows your company name as the sender — PermitCore is not mentioned
- Includes the product name, expiry date, and days remaining
- Asks the customer to contact you to renew
Reseller Portal
The Reseller Portal lets you invite partner companies or distributors to issue licenses on your behalf. Each reseller gets their own login and can create licenses only for the products you authorize — with optional caps on how many they can issue.
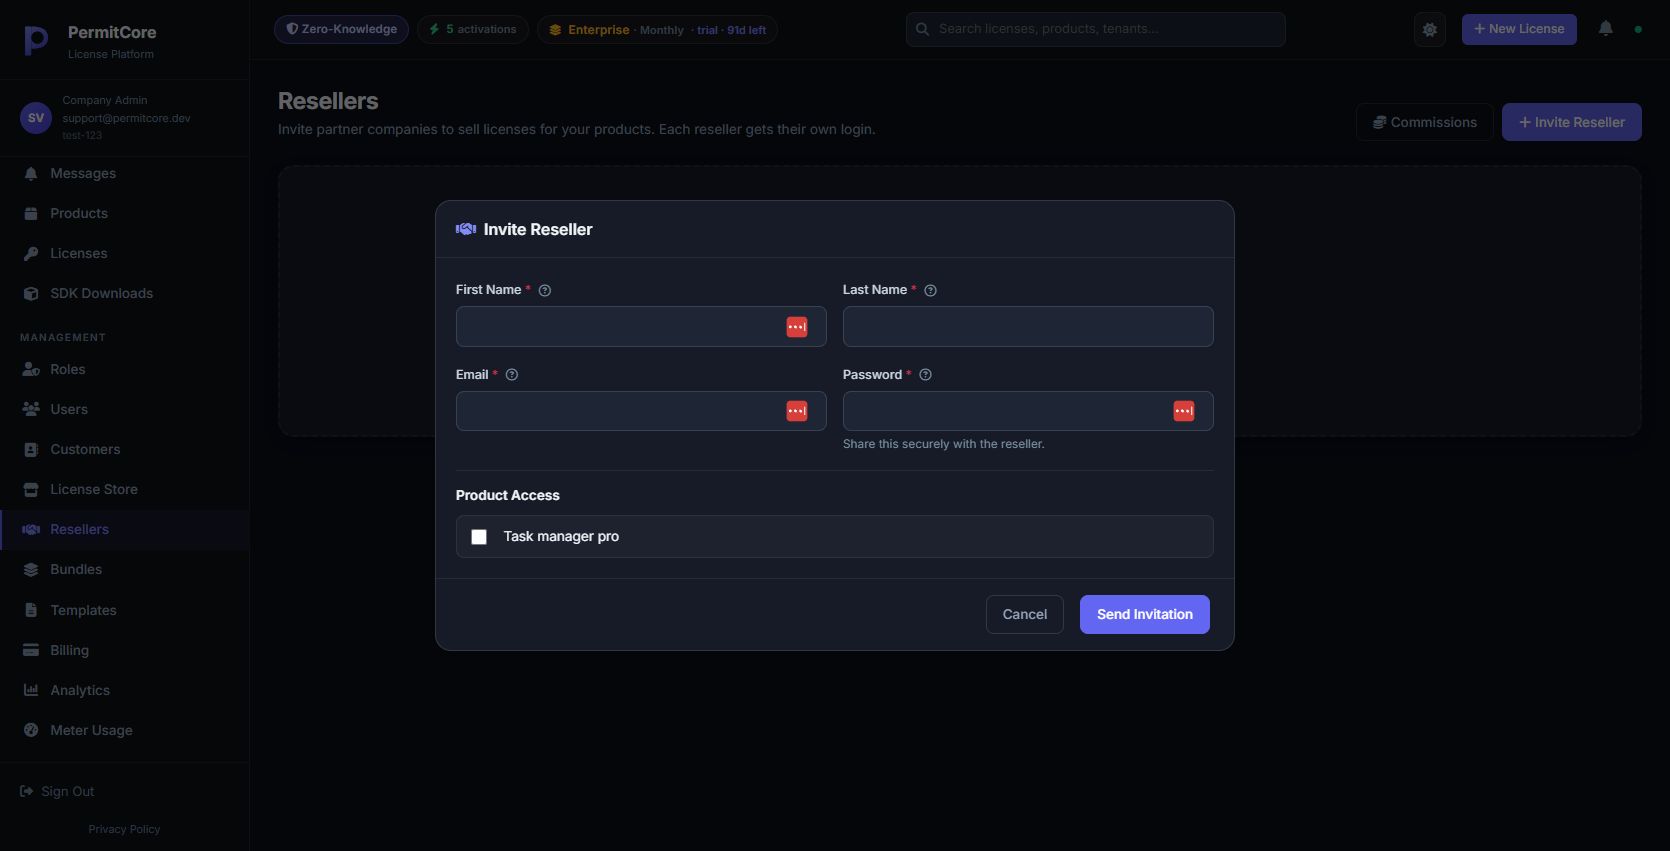
The reseller invitation form before submission. Choose product access and configure the partner before sending the invitation.
How it works
- Go to Resellers in the sidebar and click Invite Reseller
- Enter the reseller's name, email, and a temporary password
- Select which products they can sell and optionally set a max license count per product
- The reseller logs in with their credentials and creates licenses from their own dashboard
- New live activations of reseller-issued keys count against your monthly activation allowance; creating the key itself does not consume an activation
Reseller permissions
| Can do | Cannot do |
|---|---|
| Create licenses for assigned products | Access products not assigned to them |
| View their own created licenses | See other users or company settings |
| View order/activation counts for their licenses | Access billing or payment settings |
| Generate up to their per-product cap | Exceed the license cap set by you |
Managing resellers
From the Resellers page you can:
- Deactivate a reseller — immediately blocks their login without deleting their account or the licenses they've created
- Adjust product access — add or remove products, change the license cap
- Monitor issuance — see how many licenses each reseller has created per product
Commission tracking
When you invite a reseller, you can set a commission percentage per product (0–100%). Every order placed through a reseller link automatically records the commission amount at the time of sale — so changing the rate later does not retroactively affect existing orders.
- Go to Resellers → Invite Reseller and enter a commission % for each product.
- When a customer purchases through a reseller link, the order records
ResellerId,CommissionPercent, and the computedCommissionAmount. - Open the Commissions tab on the Resellers page to see all pending and paid commissions grouped by reseller.
- Select one or more orders and click Mark as Paid to record payment. The system logs
CommissionPaidAtand updates the reseller's running total.
| Field | Description |
|---|---|
CommissionPercent | Rate set per reseller × product pair (snapshot taken at sale time) |
CommissionAmount | Pre-computed: OrderTotal × CommissionPercent / 100 |
TotalEarned | Running total of all commission amounts ever assigned |
TotalPaid | Running total of commissions marked as paid |
| Unpaid balance | TotalEarned − TotalPaid — shown in the Commissions tab |